| TheWoodcrafter.net |
 Copyright © 2004. |
| My Basic Projects |
| The Retro Section |
| Jr. Woodcrafter |
| My Work |
| Detailed Plans |
| About |
| Lathe Work |
| Safety |
| Hints |
| Pic Gallery |
| Links |
| Search |
| Home |
| Birdhouses |
| Guest Book |
| Contact Us |
|
|
||||||||
|
Pencil Box
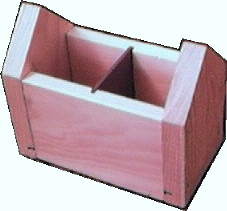 The actual finished item. |
So your children are back in school and everything is back to normal(?) in your house. Now is a good time for your young woodcrafter to make a pencil holder to keep all those pens and pencils together for homework. This simple project can be left unfinished or you can stain or paint it. The Jr, Woodcrafter actually painted it then drew pictures on the final item later. |
 |
|
Start by cutting out the pieces as follows:
|
|
| The Jr Woodcrafter will need the six wood pieces, the directions, ten (10) 1½" finishing nails, one sheet of 150 grit sandpaper, a really cool workshop apron small enough for kids, and safety goggles. | |
| Construction. | |
| 1. Attach the sides to one end. 2. Start four 1-1/2" finishing nails into the end piece as indicated by the four small black dots in detail A. 3. Make sure you start the nails on the outer side (the side without the groove). 4. Drive the nails to the point they are about to, or just barely, go all the way through. 5. Apply glue to the end of one side (part B). 6. Position the side, as shown in detail 1, and drive the two nails all the way in.. |
|
 |
|
| 7. Apply glue to the end of the other side (part B). 8. Position the side, as shown in detail 1, and drive the two nails all the way in.. 9. Slide the bottom piece (C), smooth side up, into the grooves formed by the end and the sides. 10. Start four 1-1/2" finishing nails into the remaining end piece as before 11. Slide the divider (part D) into the groove but do not glue it in. 12. Apply glue to the two exposed ends of the sides (part B). |
|
 |
|
| 13. Position the last end in place and drive all four nails in completely. 14. Sand all remaining surfaces and edges to remove all sharp corners and smooth all surfaces. You may wish to finish the entire box by spraying on a clear protective finish. |
|
| * * * * Click on any picture above to download a higher resolution picture. * * * * |
*********** WARNING***********
Read my page on safety before building this item.