|
|
|
The Woodcrafter Page© 2004 - all rights reserved.
|
|
|
|
| Sports
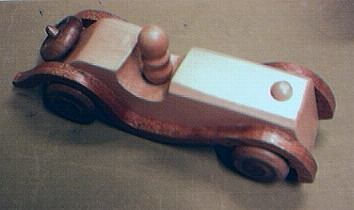
Car Here is my young son's
favorite toy project.
It is my own design taken from a picture of an
old toy.
I included a color picture of it to show the
beauty of a nicely finshed version.
 Here is an easy
to build toy that is lots of fun
to make and even more fun for the
child you give it to. It serves
well as an everyday toy when made
of pine or as a special toy when
select hardwoods are used.
I made the body from Maple, the
driver from Hickory, and the
wheels & runners from Black
Walnut.
|
 |
|
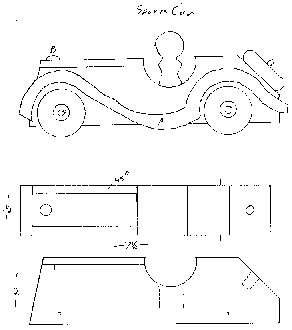
You do not need to print
these diagrams in scale as all dimensions
are given.
However, simply right-click on the
diagram (above) for the full size
templates in a pdf file. |
|
Detailed
Instructions
***********
WARNING***********
Read my page on safety
before building this item.
Materials needed:
10" long board 2" x 4"
6" long 3/8" dowel
Construction :
Construction is very simple:
1. Locate the center of the hole for the passenger area
exactly 4" back from the front and 1-3/4" from
the bottom..
2. Drill a 1-1/2" diameter hole for the passenger
area.
3. Cut the body to 1-1/2" by 2" by 7-1/2"
4. Cut the front to a 20 degree angle as shown in the
diagrams.
5. Bevel the back at a 45 degree angle as shown in the
diagrams.
6. Cut a 45 degree bevel along the sides of the front
body area as shown in the diagrams.
7. Drill the 1/2" hole for the passenger 1/2"
deep. The exact location is not critical.
8. Drill a 3/8" hole for the radiator cap and for
the spare wheel. Exact locations are not critical.
9. Drill the 7/16" for the wheel axles, 3/8"
from the bottom edge. These must be squared with the
body.
10. The front wheel goes 7/8" back from the front
edge.
11. The rear wheel goes 1-1/2" from the rear edge.
12. Print out, or draw, a template for the running
boards.
13. Cut one running board from an 8" length of
3/4" x 2" stock then resaw it into two pieces.
14. Turn five (5) wheels on the lathe to a 1-3/8"
diameter (or slice them from a dowel).
15. Drill a 3/8" hole into each wheel. You can drill
all the way through and let the axle show as part of the
wheel.
16. Cut two pieces of 3/8" dowel for the wheels.
Test the lengths before gluing.
17. Cut one piece of 3/8" dowel for the spare wheel.
Test the lengths before gluing.
18. Sand off all sharp edges and sand all surfaces with
220 grit sandpaper.
19. Glue all parts together then finish as desired. The
toy looks fine unfinished too.
20. It's a good idea to wax the axles but be careful to
keep the wax off all areas to be glued.
21. Email me a picture of your finished item.
|
