|
|
|
The Woodcrafter Page© 2004 - all rights reserved.
|
|
|
|
Here is the orginal article from the
May - June 1956 Deltagram
ROCKWELL MANUFACTURING COMPANY - A DELTACRAFT PULICATION
|
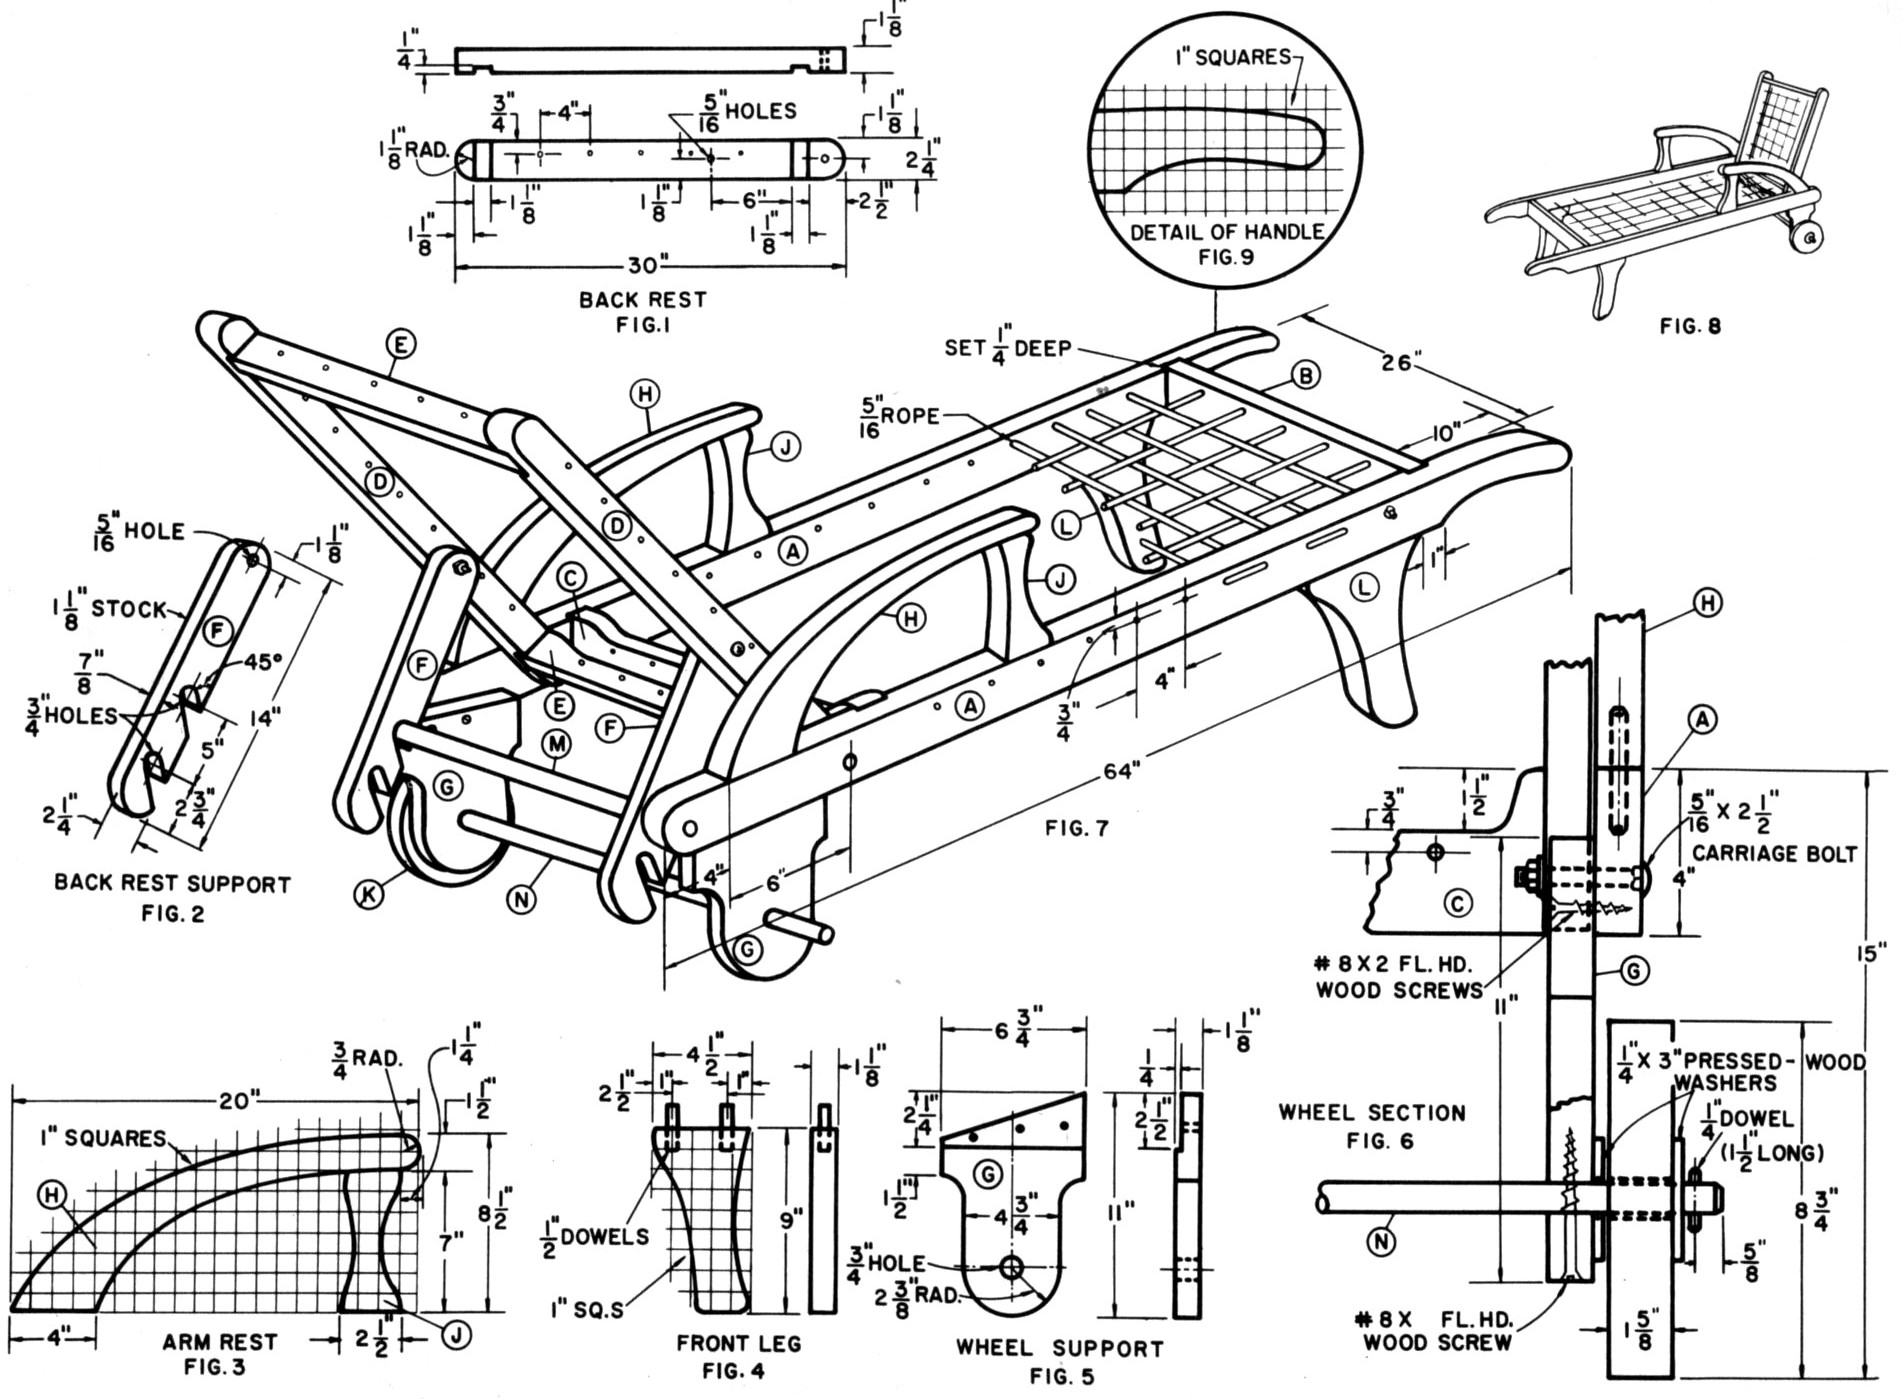
Your entire family will welcome this comfortable lounge and the opportunity it provides to spend quiet relaxing periods during the coming warm months. A two-inch foam rubber cushion covered with gay colored plastic will make this lounge a very attractive addition to your garden furniture.
The entire main frame was made of 1-1/8 in. clear pine. If cypress or redwood is available it will stand the weather much better than pine.
The crosspieces (C) and (B) are set into ¼ inch grooves in the side (A), and screw fastened together (Photo No. 4). Front legs (L) are doweled and glued with waterproof glue to the sides. Wheel axle supports (G) are screw fastened to the sides with No. 10 by 14 brass flat head wood screws.
Back rest section pivots on two 5/16 inch carriage bolts and can be adjusted to three positions of the notched supports which in turn are fastened to the back rest frame (see drawing and photos 1 and 2). The notches in the supports are first drilled with 3/4 inch machine spur bit and then the slots are cut on the band saw (see Photo No. 5).
By tacking two pieces of stock together for the arm rests (H) they can be cut at the same time (see Photo No. 3). This same process can be used on the arm rest supports (J), front legs (L) and wheel supports (G).
The wheels can be made of solid 1-5/8 in stock or built up of two pieces of 3/4 inch waterproof plywood. These are mounted on a 3/4 hardwood dowel—if a 1 inch dowel is available it would be better. Two washers made of ¼ inch tempered pressed wood are used for each wheel—¼ inch dowels on axle ends hold the wheels in place (see Fig. 6 in drawing).
The overall width and length dimensions in the drawing will accommodate a 26 x 68 inch pad. This pad is supported by a netting of 5/16 or inch sash cord which is threaded through 3/8 holes bored in
|

|
the main frame and pivoted back rest.
Space the holes about 4 inches apart. Note—do not thread the rope until the project has been painted.
Break all sharp corners with a medium and fine garnet paper. Apply a coat of wood preservative and let dry for at least 48 hours before applying a white undercoat. Finish with a white outside paint and trim the front legs and wheels with green.

(Photo No. 2)
The back rest is now in a reclining position.
|
The above photo shows the lounge without the padding and the back rest in uppermost position.
| A |
2 |
Stretchers |
1-1/8 x 4 x 64 |
| B |
1 |
Cross Rails (Front) |
1-1/8 x 4 x 26½ |
| C |
1 |
Cross Rails (Rear) |
1-1/8 x 4 x 26½ |
| D |
2 |
Back Rest (Sides) |
1-1/8 x 2-1/4 x 30 |
| E |
2 |
Back Rist (Top and
bottom) |
1-1/8 x 2-1/4 x 26½ |
| F |
2 |
Back Rest
(Supports) |
1-1/8 x-1/4 x 11 |
| G |
2 |
Wheel Axle Supports |
1-1/8 x7 x 11 |
| H |
2 |
Arm Rests |
1-1/8 x 4-5/8 x 21½ |
|
J
|
2 |
Arm Rests Supports |
1-1/8 x 2½ x 7 |
| K |
2 |
Wheels |
1-1/8 x 8¾ x 8¾ |
| L |
2 |
Front Legs |
1-1/8 x 4½ x 9 |
| M |
1 |
Back Rest
Support Dowel |
¾ Dia. x 28-1/4 |
| N |
1 |
Wheel Axle |
¾ Dia. x 34-1/4 |
|
|

(Photo No. 3)
Tack stock for arms together and cut these
Out at the same time on the bond or scroll
saw. |

(Photo No. 4)
Grooves for the end stretchers are mode on
the sow in two posses over the Cat. No.
34-333 dado head. |

(Photo No. 5)
Holes for notches in bock rest supports are bored on the drill press. Pieces are tacked together and bored at one time. |
Right-click here to download the drawing as an Adobe Acrobat (pdf) file.
* * * * Click on the drawings above to download a higher resolution picture. * * * *
*********** WARNING***********
Read my page on safety before building this item.
|


