|
|
|
The Woodcrafter Page© 2004 - all rights reserved.
|
|
|
|
Heres is the first
project I finished for the CD.
Detailed
Instructions
***********
WARNING***********
Read my page on safety
before building this item.
| Click on any picture (above)
to open the project details in Adobe Acrobat. |
|
Materials
needed:
1/2" thick clear pine 6" x
16" or 12" x 8"
1/4" thick clear pine 6" x 12"
1/4" wooden dowel 2" long.
Three wire coat hangers.
Two small eyehooks.
Four thin small flat washers (1/2" to 3/4")
Wood sealer & paints (if a colorful finish is
desired).
Clear wood finish (if a natural finish is desired).
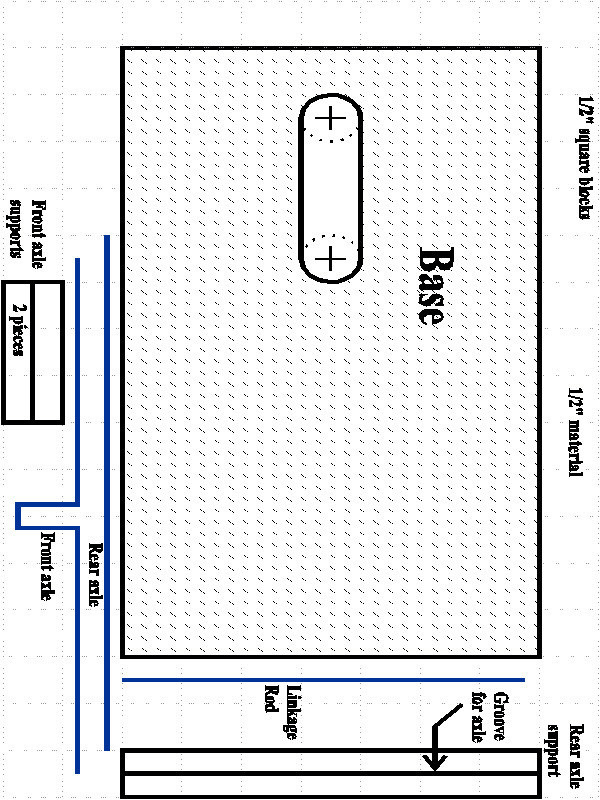
There are four scale drawings of the pieces. The first
has the base(1), the wheel blocks(3) and the axle
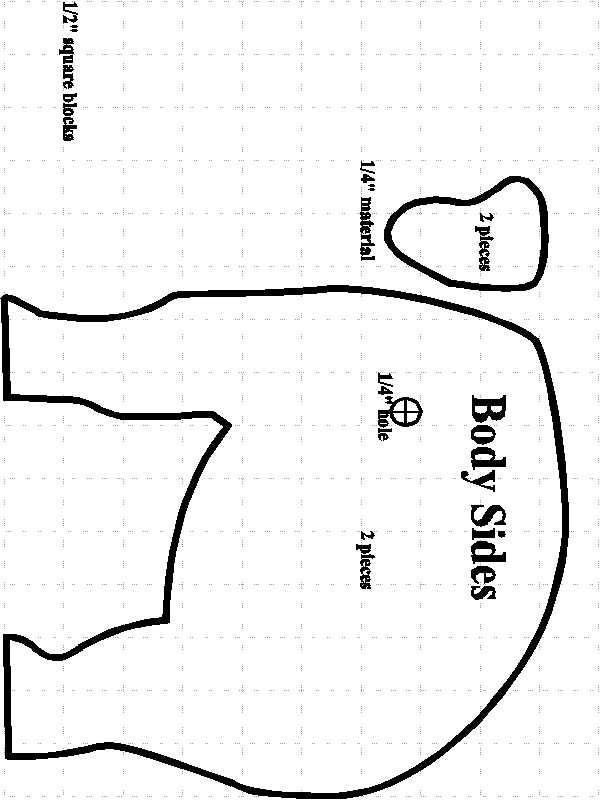
wires(2). The second contains the parts to be cut from
1/4 inch material and includes the wheels (4), the body
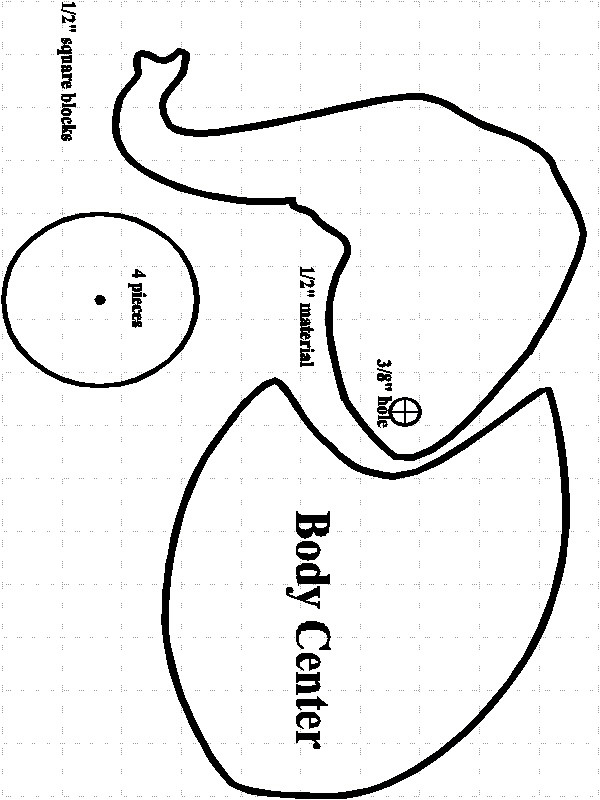
side pieces (2) and the ear pieces (2). The third
contains the parts to be cut from 1/2 inch material and
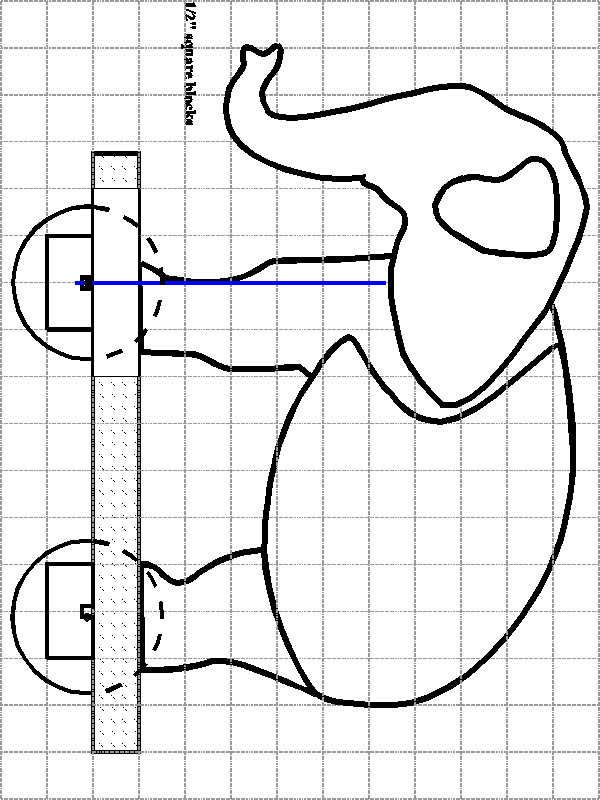
includes the head (1) and the body center piece (1). The
last page is a cutaway view of the assembled item.
Construction is very simple:
1. Print out the drawings in scale. The dotted
blocks on the drawings should be 1/2 inch by 1/2 inch
unless you wish to change the size of the finished
project.
2. Use the drawings to cut out all the parts. A band saw
works best but a scroll or saber saw will suffice.
3. Sand all edges smooth. Take care with this step as it
will show the love and care you put into the final toy.
Do not sand the front wheel edges to a completely smooth
surface as some traction is needed.
4. Locate and drill the axle holes in the wheels. These
should fit the axle very snugly.
5. Locate the centers of the two holes for the slot in
the base. Drill pilot holes with a small bit
(1/16"). Drill the final holes with a 1/2" bit.
6. Using a saber or coping saw, cut out the slot in the
base.
7. Cut a groove in each axle support piece deep enough to
receive the coat hanger wire loosely enough to allow the
axle to turn but not wobble. Use a table saw, router,
circular saw, or hand saw for this.
8. Cut out the straight section of all three coat hangers
for the axles and linkage wire.
9. Bend one coat hanger to match the drawing. The bends
can be made easily with a good pair of needle nose
pliers.
10. Cut the axles to length as indicated in the drawings.
Using a flat file, round both ends of each axle.
11. Position, glue and clamp the rear axle support in
place.
12. Position one of the front axle supports to locate the
axle 1 1/2" from the front edge then glue and clamp
the support in place. Be sure to keep the support flush
with the outer edge of the base.
13. Insert the front axle until the bend fits centered
into the cutout groove in the base.
14. Position the other front axle support then glue and
clamp it in place.
15. Locate and drill the dowel holes in the body sides
and the head.
16. Using the body center as a guide, draw a light pencil
line on the inner face of each body side
17. On both body sides, sand the inner face surface area
that will not be glued to the body center piece. Sand it
to a smooth finish and to allow the head to swing freely
after assembly.
18. Cut off a 1" section of the dowel and insert it
into one side body piece. Do NOT glue it at this time.
19. Position and glue the body center into place.
20. Position the head over the dowel, position and glue
the other body side into place, and clamp the assembly
firmly. Do NOT glue the dowel at this time.
21. Remove the dowel and the head.
22. Round/bevel all edges on the ears and the head piece
then sand the flat surfaces smooth with 200 grit
sandpaper to allow the head to swing freely after
assembly and finishing.
23. Sand and glue the ears into place.
24. After all glued parts have dried thoroughly, sand all
parts. Be sure to round/bevel all edges.
25. Finish/paint the body, the head, and the base.
26. Place the rear axle in the groove of the support
27. Add one wheel at a time.
28. Place a flat washer and one wheel on the axle then
bend the protruding wire tightly against the wheel.
Repeat for each wheel.
29. Bend the end of the head linkage wire loosely around
a small eye hook.
30. Locate the small eye hook into the bottom of the
head.
31. Position the head into the body then carefully glue
the dowel into place being careful to not glue the head.
32. Position and glue the body into place on the base.
You may wish to add a small (1/8") dowel through the
base into the legs but be very careful as the alignment
is critical.
33. Carefully bend the other end of the linkage wire
around the front axle offset.
34. Insert an eye hook into the front of the base and
attach a pull string.
|