| TheWoodcrafter.net |
 Copyright © 2004. |
| My Basic Projects |
| The Retro Section |
| Jr. Woodcrafter |
| My Work |
| Detailed Plans |
| About |
| Lathe Work |
| Safety |
| Hints |
| Pic Gallery |
| Links |
| Search |
| Home |
| Birdhouses |
| Guest Book |
| Contact Us |
|
|
||||||||
|
Here is a really nice
version of Tic-Tac-Toe.
The play pieces are stored inside the compact game
board..
Detailed
Instructions
***********
WARNING***********
Read my page on safety
before building this item.
Materials needed:
While any choice of woods will work, I
recommend 3 types of wood for the project: a light maple,
oak, and black walnut. Use the Maple for the trim, the
oak for the blocks and the walnut for the strips. Also, a
hand rubbed linseed oil finish really brings out the
grains.
Materials needed:
1/2" thick rock Maple 2" x 20" or 3"
x 10" or 5" x 5"
3/4" thick clear Oak 5" x 5"
1/4" thick clear Oak 5" x 5"
3/4" thick dark Walnut 1" x 5"
One 1/8" bolt (1 1/2" to 1 3/4" long) and
nut.
One spring.
Clear wood finish.
Construction:
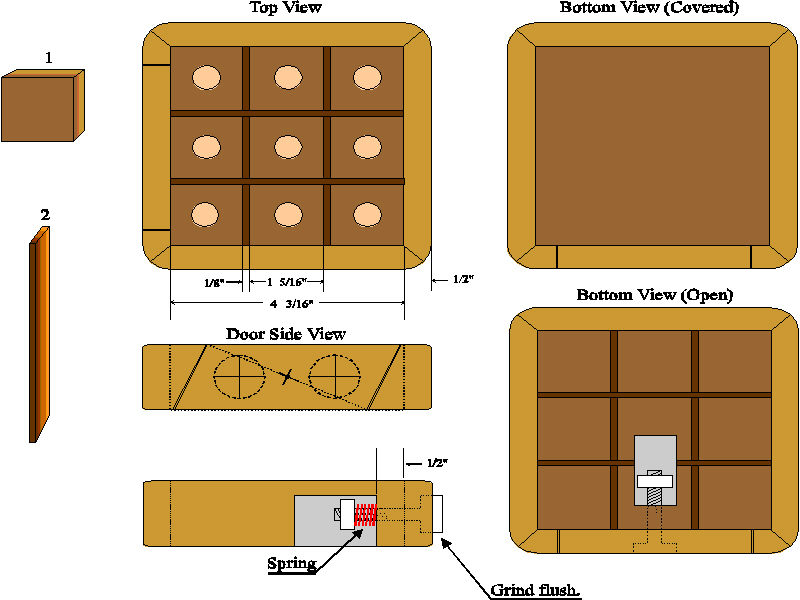
1. First, cut out the nine oak blocks. They
measure 1 5/16" by 1 5/16" by 3/4". If you
are not using a fine toothed saw, such as a band saw,
then cut the blocks slightly larger and sand to the
finished size.
2. Drill a small indent into the top of each block to
hold the marbles. A 3/8" drill bit works fine but be
careful to simply make an indent, not a hole.
3. Now cut the four dividing strips by ripping a
1/8" strip from a 3/4" Walnut plank. Make the
lengths 4 1/4" to allow fitting later. Again, if you
are not using a fine toothed saw, such as a band saw,
then cut the blocks slightly larger and sand to the
finished size.
4. Fit, glue and clamp the nine blocks and four dividing
strips together being careful to maintain the best
possible flat surface for the top. Use a square to
properly align two adjacent sides and keep the parts
aligned.
5. Locate the hole for the door bolt exactly 1/2"
from the top of the block assembly and exactly half way
from the ends. Drill a 1/8" diameter hole 1
1/2" deep.
6. Using a router or chisel, cut the bottom notch to
accept the bolt, nut and spring as indicated in the
bottom view. Be sure to allow for the thickness of the
trim. The dimensions are not critical but keep the
clearance as close as possible. The nut should barely be
able to turn inside the notch.
7. If the block assembly bottom is not smooth, sand it to
an even thickness all over.
8. Sand the door edge of the block assembly to a flat,
square surface.
9. Cut the Maple into four pieces 1/2" thick and
1" wide by 5" long.
10. Carefully fit and miter one Maple side.
11. Locate the exact center of this piece by drawing
precise pencil lines from corner to corner.
12. Drill a 1/8" diameter hole through the center.
13. Measure the diameter of the bolt head and drill a
hole the same diameter as the bolt head 1/4" deep in
the same spot to create the bolt recess.
14. Cut the door as indicated in the Door Side View. The
angles are not critical as long as they match.
15. Insert the bolt through the door and place the door
and bolt on the block assembly.
16. Slide the spring over the bolt and attach the nut.
The spring needs to be strong enough to keep the door
from swinging open on its own yet let you open the door
with ease.
17. When the fit is good, seal the nut with lock-tight or
finger nail polish to keep it from working loose.
18. Cut the oak bottom from a 1/4" thick piece into
a 4 1/4" square.
19. Locate, glue and clamp the bottom being careful to
not glue the door to the block assembly.
20. Drill the two holes to store the marbles behind the
door. The holes should be one size larger than the
marbles and extend through the other side of the
assembly. Locate the holes so they clear the door.
21. Sand the three remaining edges of the block assembly
to a flat, square surface.
22. Carefully fit and miter the three remaining Maple
sides and the two triangles on the door side.
23. If necessary, grind the bolt head smooth with the
wood surface.
24. Sand the entire outer surface to a flat-smooth
finish.
25. If the door sticks, use bee’s wax on the inner
surfaces and the bolt.

