This is a fifty nine inch diameter
round picnic table with matching curved
benches. It is easy to build and can be
completed in a day (excluding drying time
of paint). The benches are designed for
individuals but six fit easily around the
table. I suggest you glue all parts with
an exterior grade glue for best results.
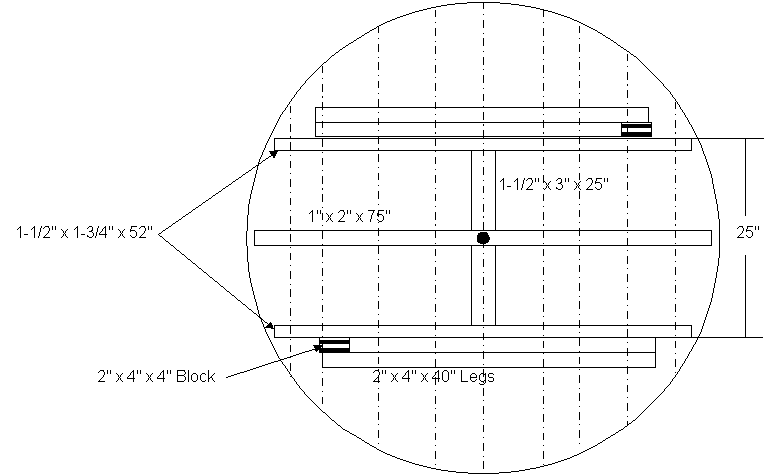
The table top is made from
1-1/2" stock of varying widths (see
dotted lines on diagram at left.) placed
across two parallel 1-1/2" x
1-3/4" main supports. The supports
are set with their outer edges at exactly
25". A third support of 1" x
2" material runs across the middle.
To assemble the top, lay enough 60"
long boards side-by-side on the floor to
add up to a 59" width. Place the
center support across the center of the
pieces and attach it to the first piece
with a 2" screw. Go to the opposite
side, press all the boards firmly
together and secure the other end of the
support to the last piece with a 2"
screw. Attach the center support to each
board with 2" screws. Carefully
position the two main supports for a
25" distance from outer edge to
outer edge and secure them into place
with 2-1/2 screws. Counter sink all these
screws to avoid scrapes and cuts later.
Locate the center by drawing pencil lines
corner to corner. Using a 60" long
piece of any small scap material draw a
59" circle by nailing the end of the
board to the center, mark the edge
29-1/2" out and pivot the board on
the nail while holding a pencil at the
29-1/2" mark. Cut the table to
round.
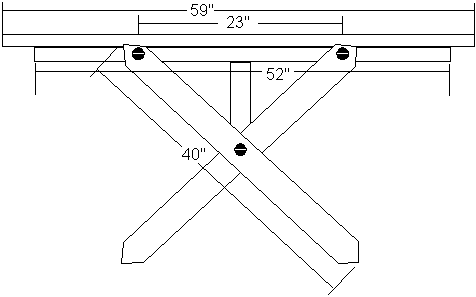
The legs are made from 2" x
4" stock and are set at 45 degree
angles for simplicity. Cut the legs
40" long then miter the ends with 45
degree cuts as indicated in the drawings.
Attach the legs to the cross support
(1-1/2" x 3" x 25") with
6" long 3/8" lag bolts. The lag
bolt goes through the legs at the center
point (20"). Attach the legs to the
main frame under the top with 3/8"
carriage bolts so they are 23" apart
at centers and centered on the table. You
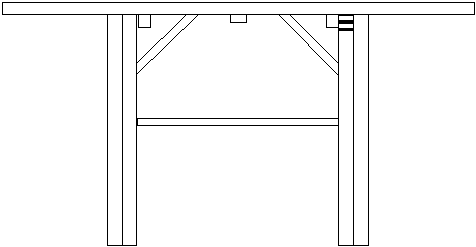
will need a small 2" x 4" x
2" block for one leg on each side of
the table as shown in show in the
drawings to the left and above left. Add
the 45 degree side supports show in the
drawing to left. Drill a 1-1/2" hole
through the top and the leg support if
you wish to add an umbrella.
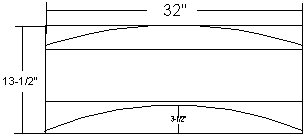
The stools use a similar
construction. Use three boards (see first
diagram at right) for the top being
careful to choose widths that will not
result in cutting any too thin on the
ends (leave at least 2" thickness).
The main supports are 1-1/2' x
1-3/4" x 10" and the legs are
of 2" x 3" x 18" material.
The block is 2" x 3" x 2".
Miter the end of the legs at 30-60 degree
angles leaving the most surface against
the ground and the top of the bench. The
curves for the bench are 10' for the
outer curve and 8' for the inner curve.
You can freehand these if desired. The
curve swings in 3-1/2" at the bench
center.
*
* * * Click on the picture above to
download a higher resolution picture. * * * *
***********
WARNING*********** Read my page on safety
before building this item.